Finding Patience and Pride at 22,841 feet on the Summit of Aconcagua

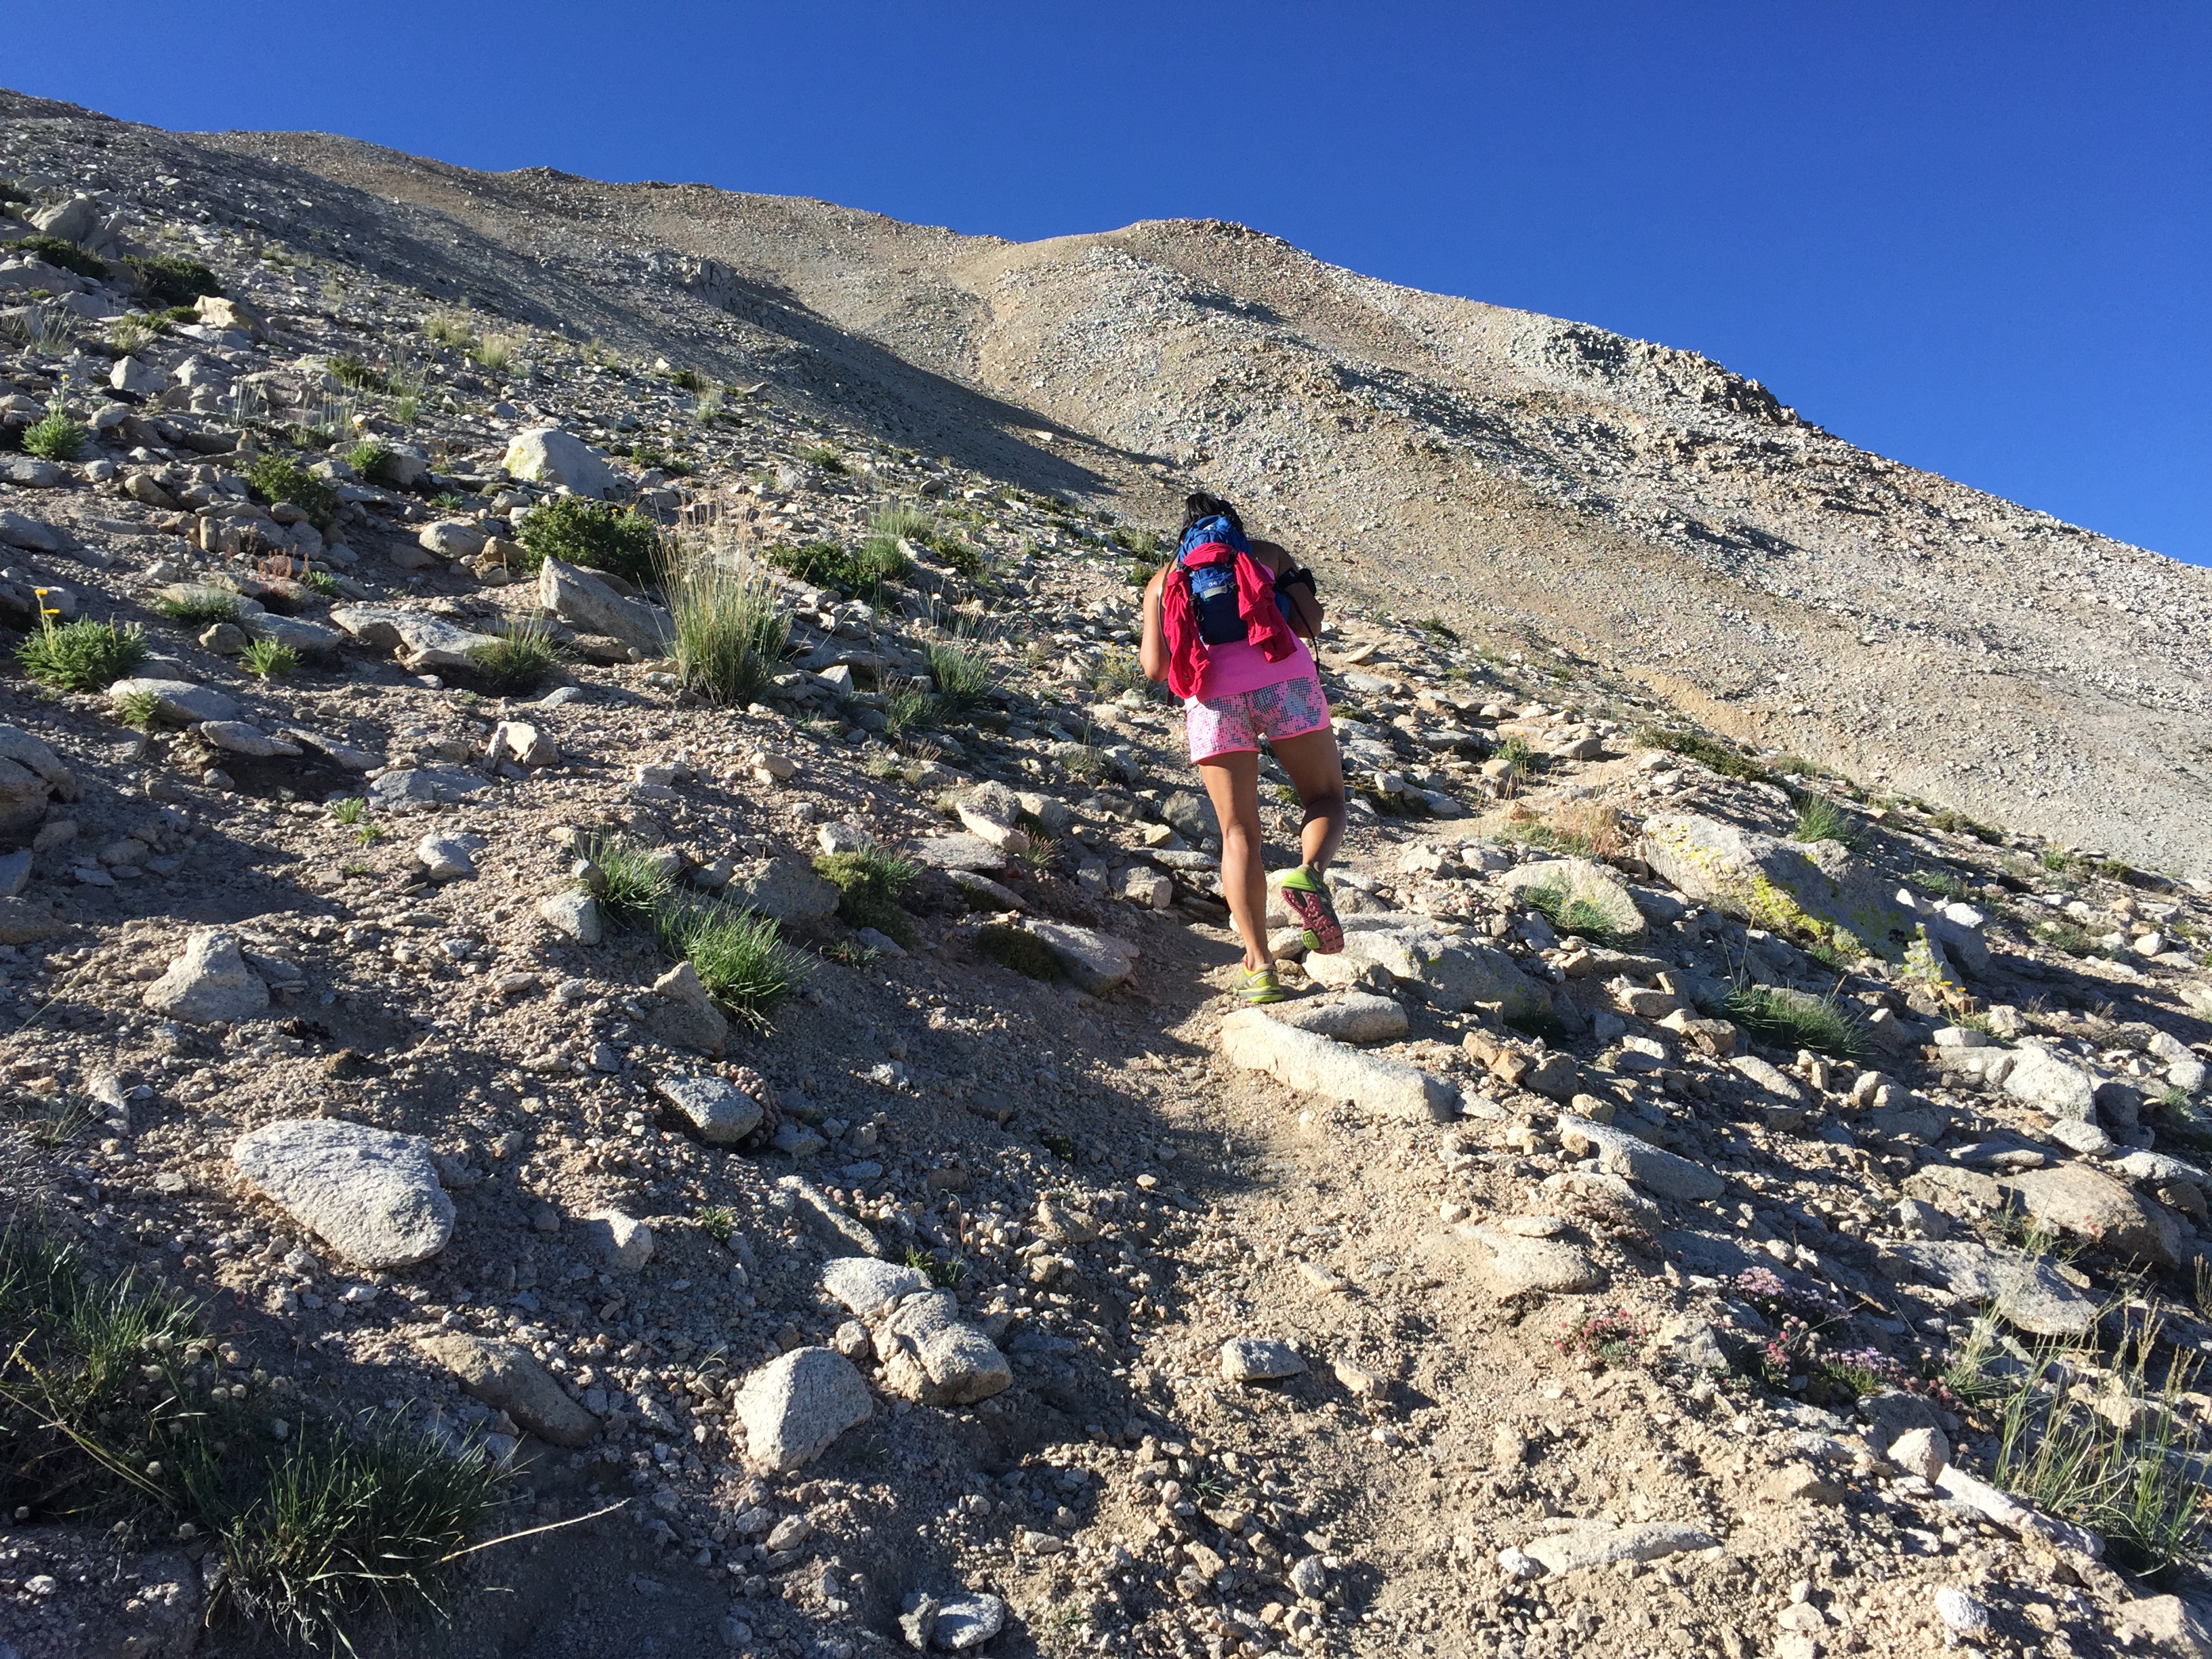
“I feel drunk right now,” Nina groaned. She was wobbling, her balance impacted by the increasing elevation, though each teetering step continued to propel her up towards the summit at the rapid speed of 250 vertical feet an hour.

Hanne hiked quietly, deliberately placing one step in front of the other, occasionally looking up towards the summit with a glowing grin plastered across bright red cheeks. I kept meaning to remind her to cover her face with her buff as the sun gradually showed its strength on her fair Norwegian skin, but then my thoughts would float skyward.

We’d been hiking up the same gully for (seemingly endless) hours. The summit was so close we could practically reach out and touch it, and I knew that Nina – one of the strongest women I know, an ultra marathoner and mountain runner – was no doubt dreaming of jogging on up as she did her local LA peaks. However, our hands were tied by the high altitude’s oppressive demands. Even if we could move any faster, it wouldn’t be smart or healthy for our body’s acclimatization. Just as on the rest of this entire trip, we were forced to move at a snail’s pace.

This was a real test of patience for all of us.

img_7736

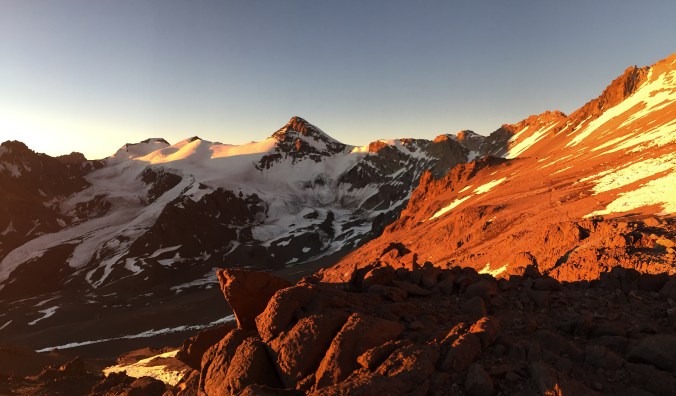
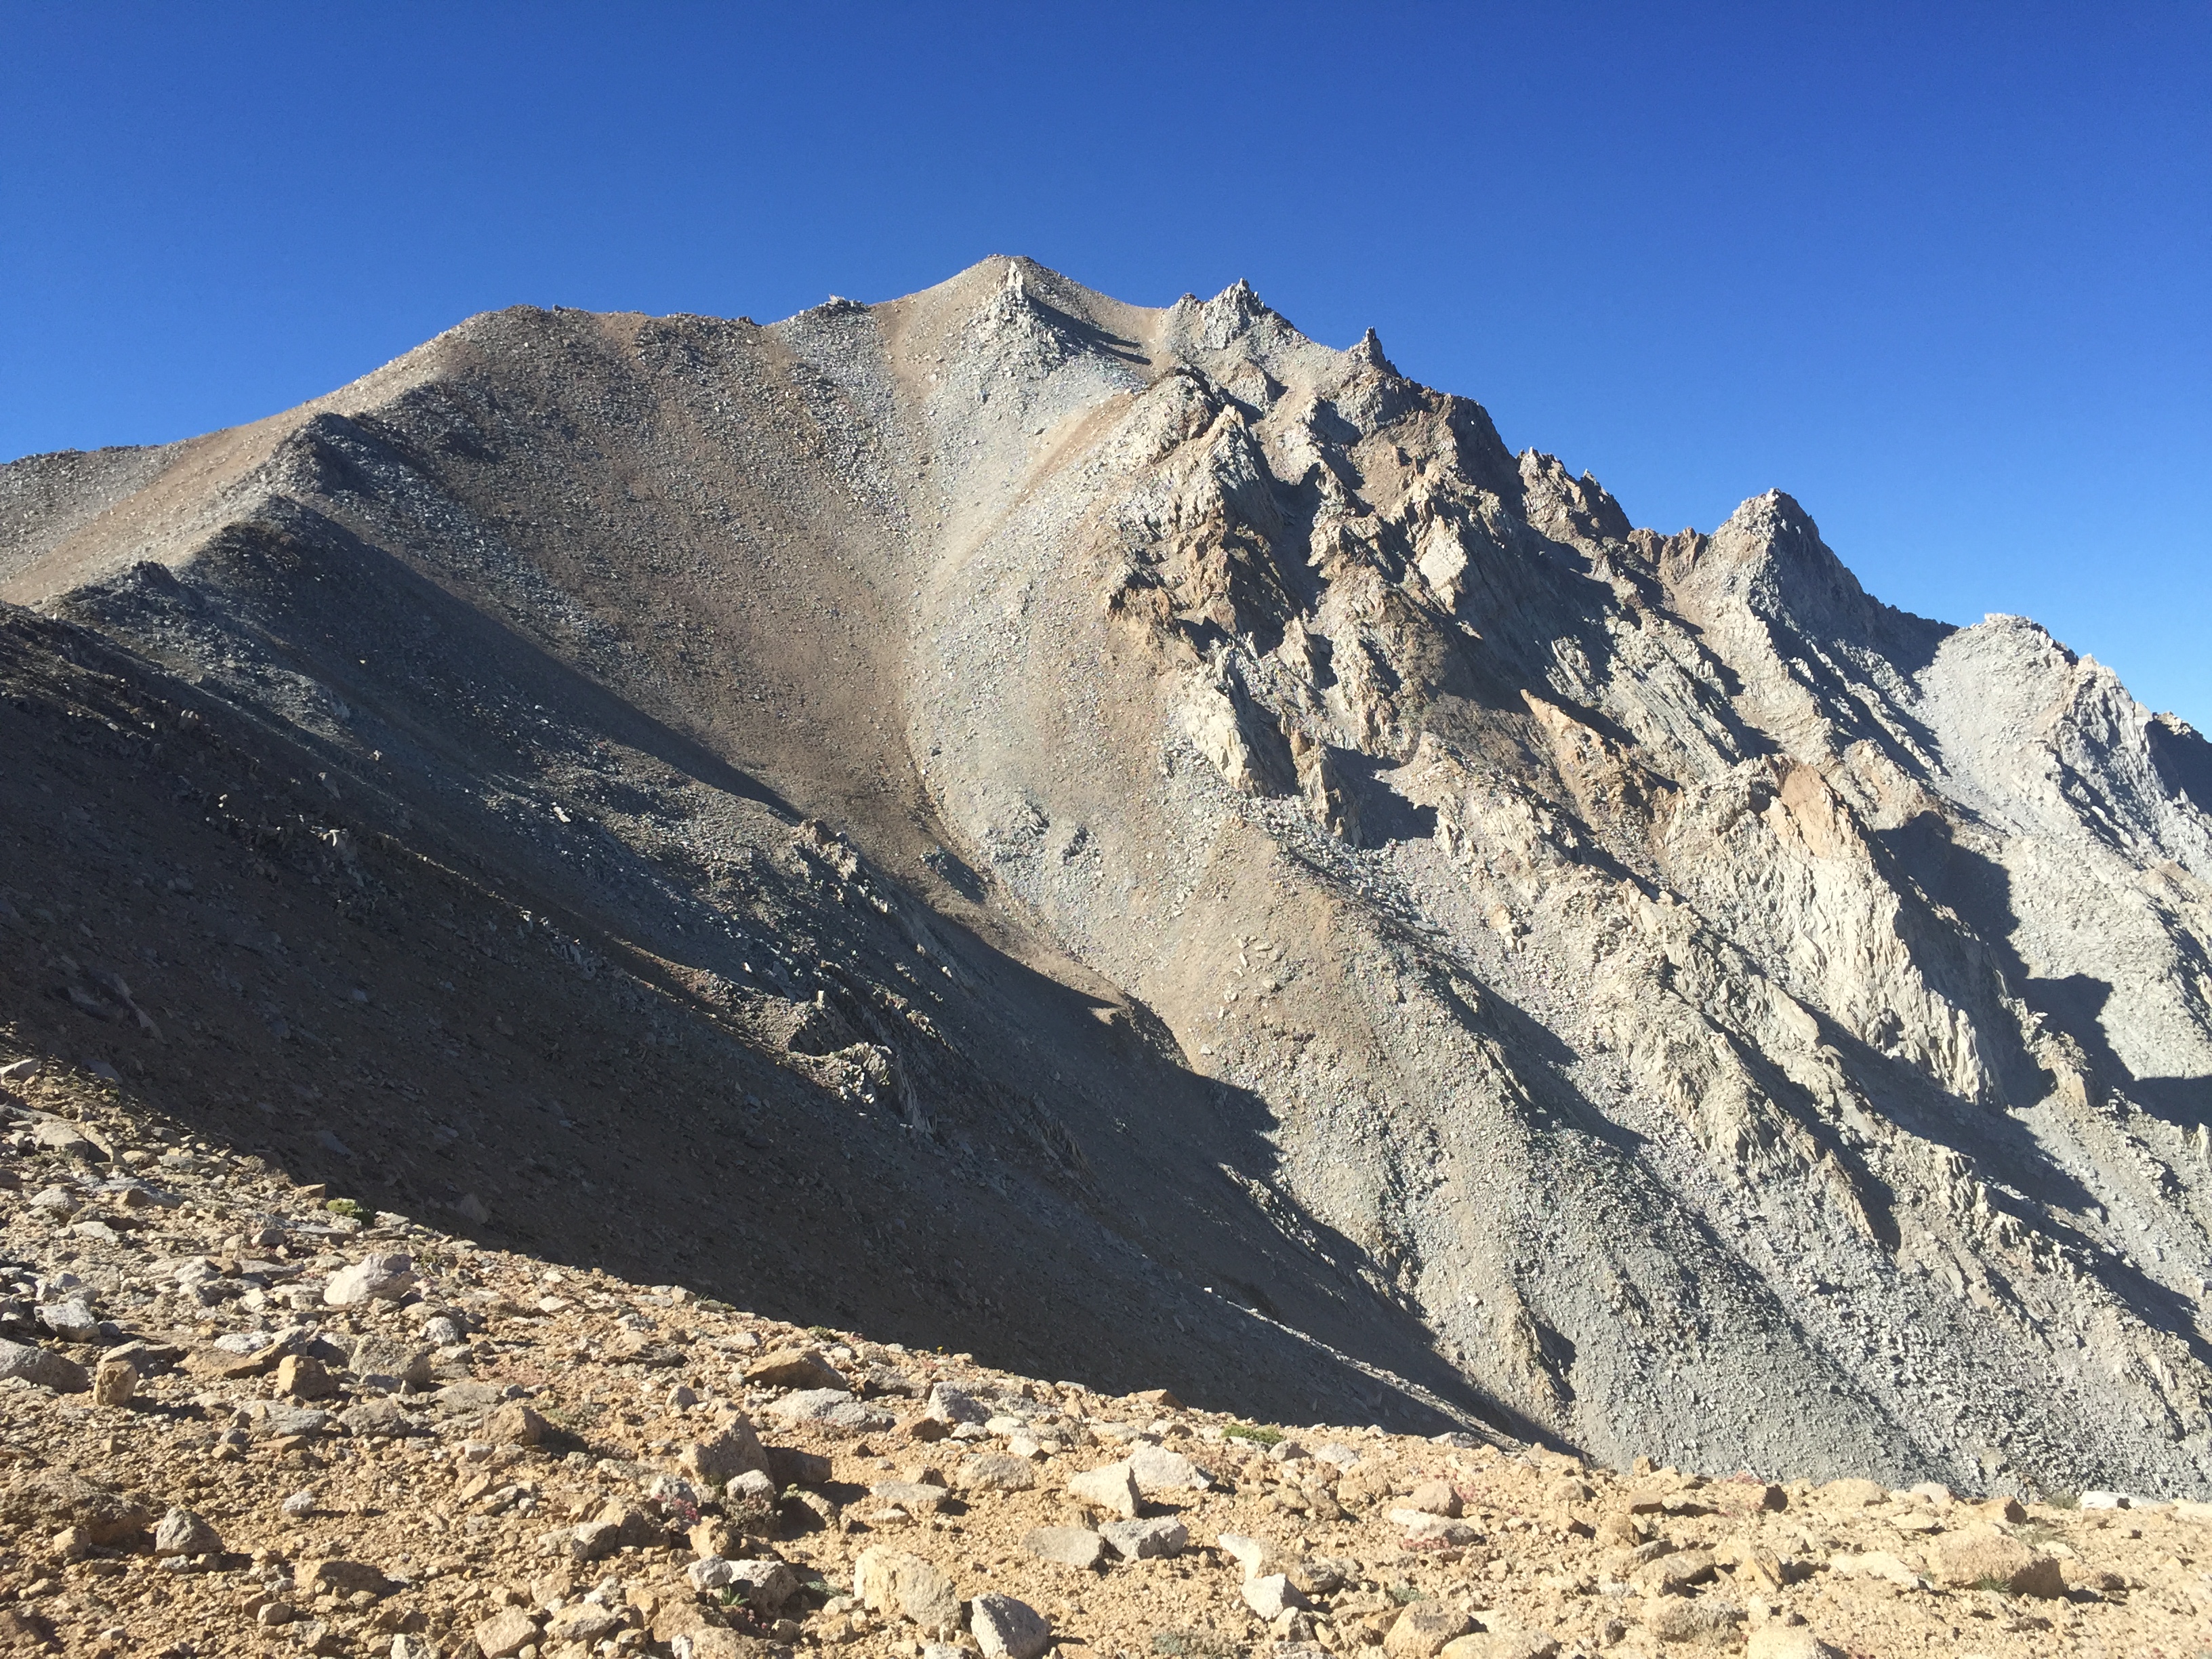
Neighboring peaks of Aconcagua shot at sunset from our first high camp.


For the first time in my life, I experienced what high-altitude mountaineers describe in books, speeches, and tales from higher places. My breath lagged, my legs adopting the weight of concrete blocks. Every step strained my muscles, every sharp inhale seemed to do the job of half. I moved the slowest I ever have on a hike or climb, and somehow my spirit still soared.

I was functioning very well for such a high altitude. I’ve summited three other peaks near the 20,000 foot mark and always felt fine and strong, but this was new territory. The extra 2,800 feet on Aconcagua was significant enough to demand my full attention, and every foot I moved higher on summit day, I felt my strength challenged.

Of course, there’s a lot more that goes into the physical challenge that mountaineering inflicts on your body. A lot of it is unseen.

img_7882

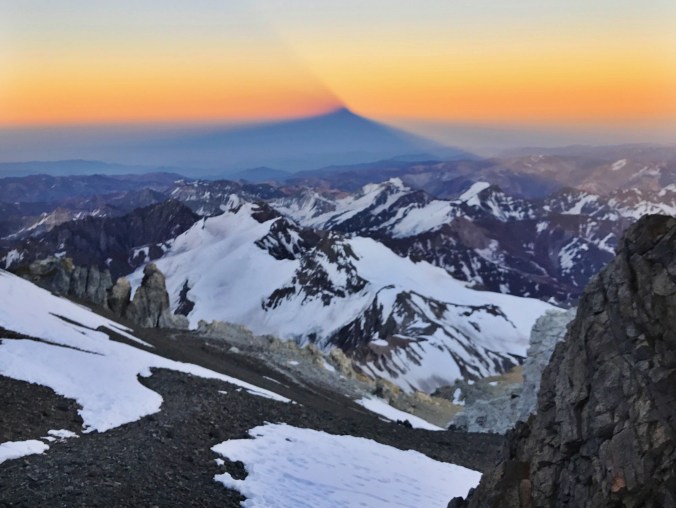
The shadow of Aconcagua stretches over the horizon at sunrise.

Summit morning

It’s 4am when we hear the familiar clank of stoves and shovels as our guides wake up to begin melting snow for breakfast. The three of us clients lay stiff in our sleeping bags, afraid to move just an inch in case the chilled air could leak into our perfectly warmed cocoons, while Miki, Charlie, and Ulises brave the cold. Our valiant guides had already melted 60 liters the night before, to ensure every climber would have enough liquids to get them through the night and the entire summit day. Each of them were strong, selfless, and big reasons as to how each of us remained healthy and happy throughout our expedition.

As to be expected, not one of the three of us really slept that night. Our high camp Colera was at 19,586 feet, two hundred feet higher than the summit of Kilimanjaro. Miki was right about one thing; it was a lot more comfortable squeezing three women into our two-person tent, the body warmth at least made our last evening more bearable.

But that’s not why we had tripled-up. We were warned that a solo inhabitant wouldn’t have the body weight to hold the shelter down in case of high winds. Our guides had dealt with a similar situation before: Chasing a willowy female client down the mountain as her tent catapulted her, body and all, past camp and towards a steep drop-off.

Besides, we were teeming with excitement, eagerness, and just a little bit of anxiousness for what the morning would bring. None of us quite wanted to get our hopes up.

img_7790

Killing time in the dining tent at 18,200 feet, where we were camped for three nights.

Two days before

The wind is too strong to entirely stand up, so we half walk, half bear crawl from sleeping tent to dining tent.

A howling 70 mph gust goes by, and we scramble to reinforce our shelters with 20, 30, and 40 pound rocks. Each of us is slowly, numbingly losing feeling in the tips of our fingers, toes, and nose as the temperature plummets with the lowering barometric pressure. We try to resist calls from Mother Nature, dreading the contact of wind on delicate skin, leaning against a small frozen rock more for the emotional comfort rather than any real wind block.

We’ve already spent two nights at Nido de Condores, our intermediate high camp at 18,241 feet. We’re behind schedule, using up our extra weather days for their very intent. Every day we see bluebird skies: The forecast doesn’t predict any precipitation; this is a dry, clear, yet deadly windy storm. With gusts reaching 100km at our current elevation, we can’t imagine what climbers up high were experiencing.

img_7795

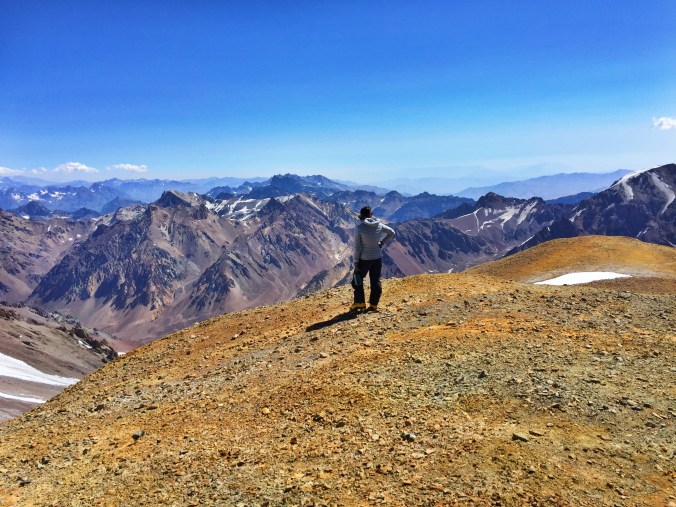
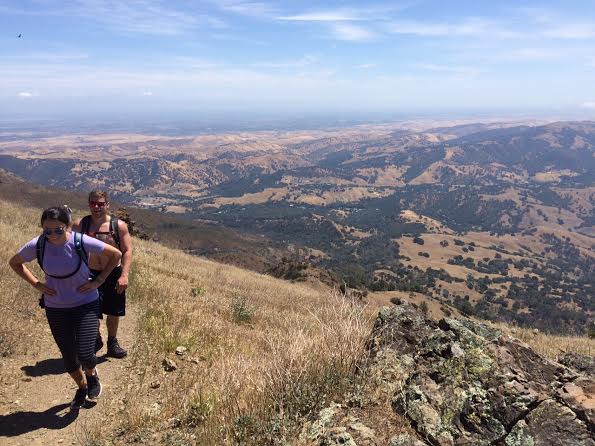
Nina looks out over Argentina’s Andes mountain range on an acclimatization hike.


A few of the friends we’d made at base camp are turned around from their summit attempt, and we feel for them, in part because we’re all thinking the same thing: The longer we spend here, expelling energy at such a high elevation, eating our food reserves, and waiting for a last ditch chance for the weather, the lower our chances are for our own summit attempt.

We’d accepted this possibility, our most probable outcome at the moment, getting ready to spend our third night at Nido when Miki asks to meet with us.

“There’s been a change in the weather forecast. There’s a small summit window opening up in 36 hours,” he tells us. “Do we want to try our luck?”

16003010_10154836894030429_5422082491474114746_n

Photo courtesy of Hanne Lund Danielsen.

Sunrise

We’d been walking about an hour – or was it two? My watch was bundled underneath layers of jackets and gloves, and I was using the slow onset of dawn to measure time, as well as our progress.

It had been a beautiful morning so far, with a gentle wind (or “kiss from the mountain” as Miki insisted), and everyone seemed strong. We reached the broken down Refugio Independencia (20,930 ft.) just as the sun was making its final rise over the horizon, brightening up everyone’s faces and spirits. There had to be a dozen teams at this pivotal point in the climb, more climbers than any of us expected. We soaked up the rays, forced down some food, and lathered on sunscreen before strapping on our crampons and setting up the slope again.

We breached the ridge above Independencia and got a full view of our next few hours across the Great Traverse. Some of us thought it looked simple, some said it seemed like it stretched on forever. I stared out at this section draped in shadow as a gust of westward wind blasted us and had one thought only: Looks cold.

img_7520

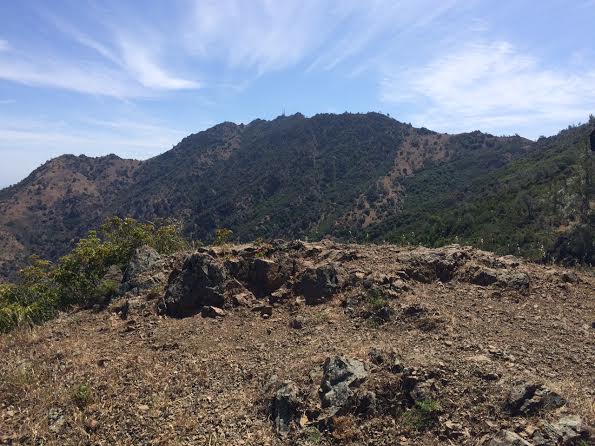
The impressive South Face of Aconcagua looms down at us from Plaza Francia (13,300 ft).

Two weeks before

“I’m boiling alive,” Hanne complained, fanning herself with a baseball hat. She was wearing shorts and a thin t-shirt and looked more comfortable than I felt in my long pants and long sleeves. I hate coating my body in sunscreen even more than I hate the heat.

The Argentinian summer heat was oppressive at our Confluencia Camp (11,300 ft). We’d come up from the trailhead the day before at the mouth of the Horcones Valley (9,678 ft.), and we were already feeling like we’d never cool off from the desert climate’s wrath. Our bodies sticky from sweat, we lamented that we still had two and a half weeks before our next shower.

Our journey was just beginning. We had just started the ritual of massive hydration, not-so-secretly competing with one another to see who was drinking the most liquids throughout the day. Even so far away from our summit attempt, we were still counting down the days to the top and maximizing our chances of success down to every minute detail.

Even though we’d seen the mountain from a distance at the very entrance to Aconcagua Provincial Park, it wasn’t until that second day at Confluencia when we really got to understand what we’d signed up for. An acclimatization hike to Plaza Francia (13,287 ft.) brought us to an absolutely breathtaking view of the south face of the mountain, peering up nearly 10,000 feet – almost two vertical miles – to the summit we’d all flown across the world for.

I think we joked to each other about the heat, and the hydration, because all along we all really knew that things would get a lot less comfortable up high. But we still had a long way to go.

img_7832

Our descent on summit day, racing the sunset back to camp after 7pm.

The final slog

The long, undulating and gradual traverse led us to La Cueva (21,817 ft.), or The Cave, at the base of a large rock wall. Here, climbers gather strength and enjoy their last break before the final summit push, all while facing the objectively most difficult – and most dangerous – part of our day.

The Canaleta is the steepest section of the entire climb, beginning from the base of La Cueva and stretching up just a few hundred feet short of the summit. When dry, the Canaleta is plagued with deep scree that backtracks climber’s progress nearly two-fold. Sections reminded me of the volcanic ash I was so familiar with climbing back home on Mt. St. Helens, South Sister, Mt. Adams: One step up, two slides down.

We were lucky. Because of the last week’s storm, we greeted the hard-packed snow and ice that covered the Canaleta with gratefulness.

So here we were, with Nina’s restiveness, Hanne’s stoic march, and my haggard breaths slowly inching us towards our goal. Our guides Miki and Charlie coached us mentally just as much physically, as the impatience of the preceding two weeks crept up on us and I fought the urge to race ahead.

Finally, minutes blended into moments, and we were greeted with flashes of brightly colored parkas, national flags, and a decorations adorning the summit cross. We’d made it to the top.

img_7830

Nina, Hanne, and myself on the summit of Aconcagua (22,841 ft).

It’d be easy to say that our hard work and perseverance paid off. From the months spent training at home, to the days of load-carrying to camps. But I think that we owe the real credit to the mental battles each of us faced. Fighting through the internal protests of: “I’m too cold,” “I’m too tired,” “I’m not cut out for this.” Breaking the opposing mental walls of agony and boredom, seeing past the easy way off the mountain and silently suffering through the discomfort. I credit our success to our patience on acclimatization days, bad weather days, and mornings we were too cold to leave our tent.

We wouldn’t have shown up if we weren’t physically fit enough for the task at hand, but we wouldn’t have succeeded if our mental and emotional strength didn’t stand up to the challenge. Patience is similar to pride, gratefulness, and joy in that it can be invisible… but they’re the most valuable things we carried with us once we left that summit.

img_7879

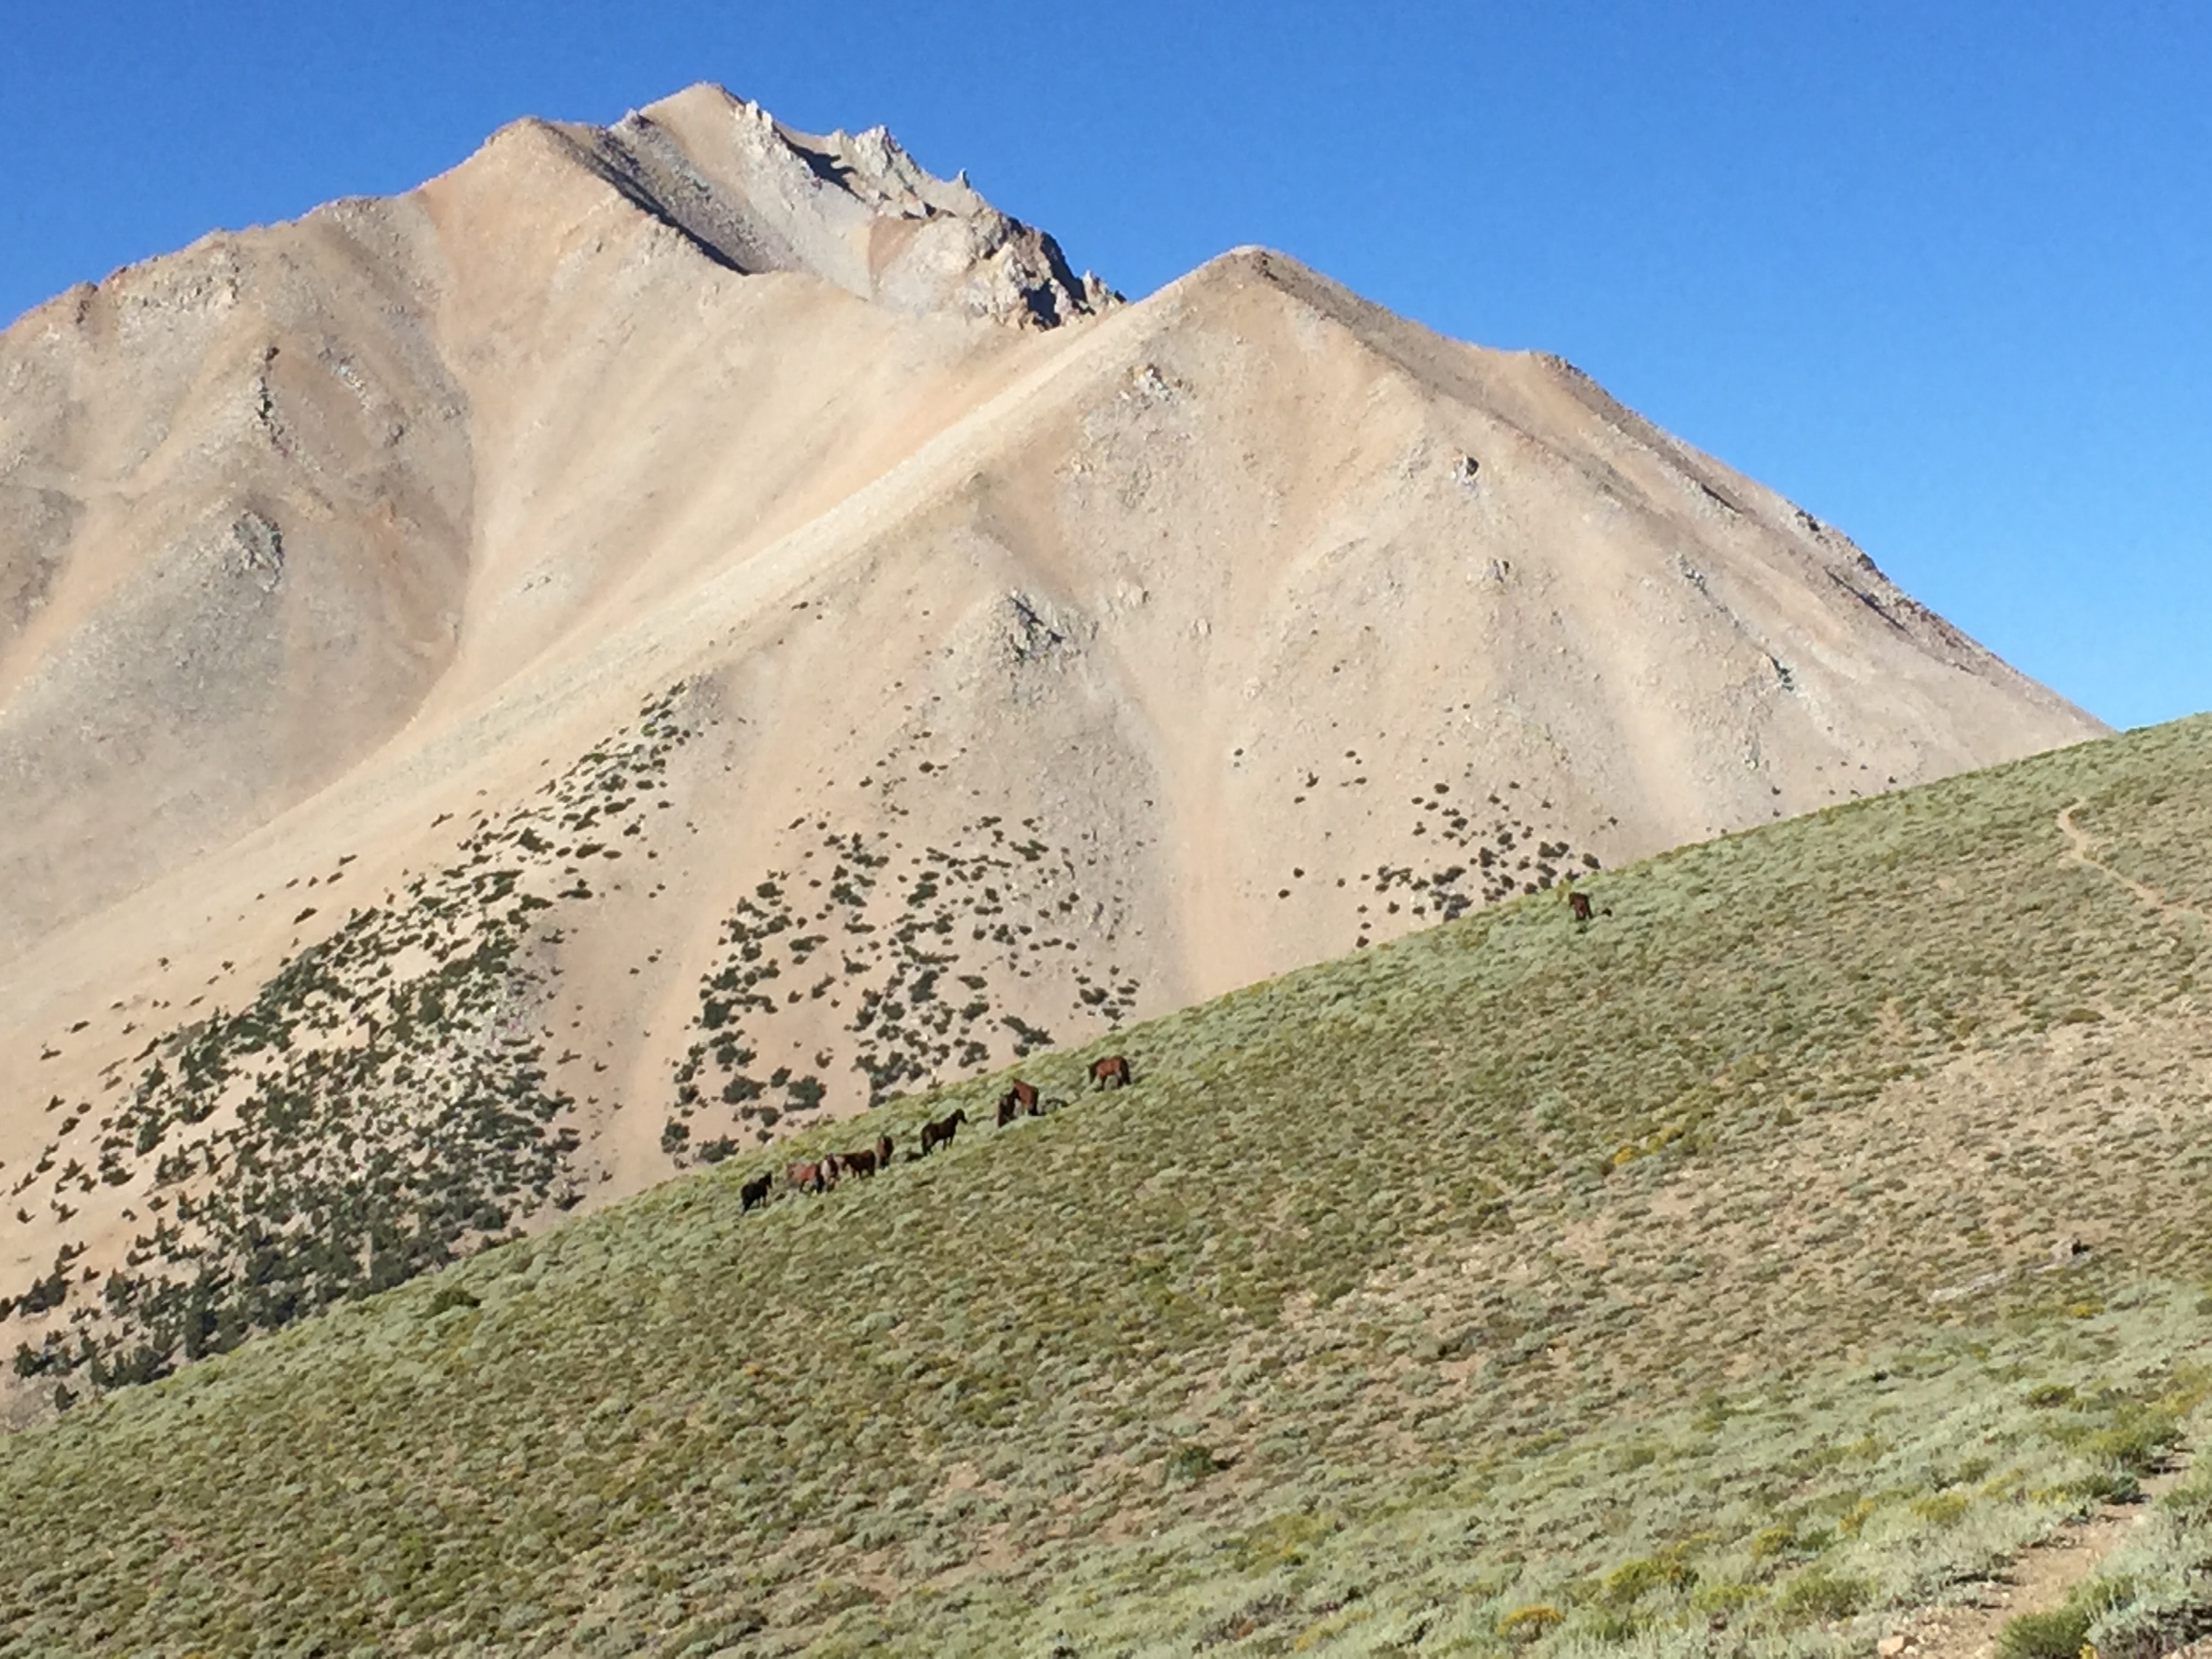
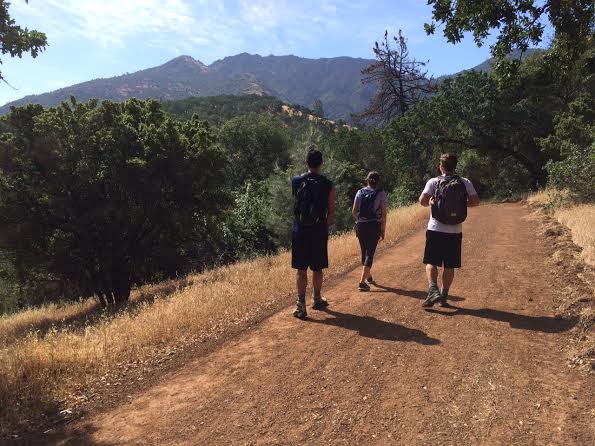
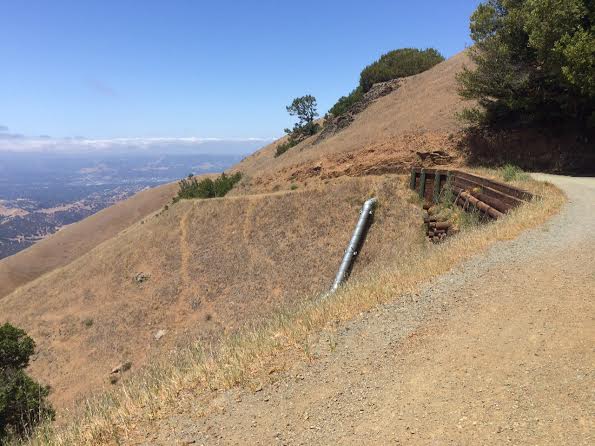
Photo taken from a load-carry acclimatization hike. Aconcagua marks the third continent, and fifth summit, that Nina and I have tackled together.

2017 Goals! My New Year’s Resolutions to Adventure More

The last year has been a whirlwind of international travel, more than a few successful summits, and weeks-long treks through some of the most beautiful mountain ranges in the world. I saw and did way more in 2016 than I’d ever expected, so my goals looking towards the New Year are more focused – and more local.

One huge difference in 2017 is my focus towards running. The six months I spent hiking and climbing last year left my legs stronger than they’d ever been before, and completely unfit for running. The adjustment back to a quick pace has been a long and gradual one, but the first adventure goal on my list (first full marathon) is sure to kick my butt into gear.

Things I WILL do:

Things I’d like to do:

  • Mt. Hood Winter Ascent: This goal depends on how long winter lasts, and whether I can rally a climbing partner to join me. Any takers?
  • Take a ski mountaineering course, ice climbing course, and more ropes courses at an indoor gym. Ski touring and ice climbing is something I’m totally unfamiliar with, and I’d like to learn more about avalanche safety and crevasse navigation before setting off on a winter ascent of Adams, St. Helens, and other more remote volcanoes.
  • Run the Zion Traverse (50 miles, 6500 ft. elevation)
  • Run the 8000 meter challenge (40 miles, 12000 feet elevation), also known as the SoCal Triple Crown
  • Ragnar Trail Run Relay: Mt. Rainier
  • Explore the Tetons National Park, climb Grand Teton (13,770 ft.)
  • Explore Yellowstone National Park, run the Yellowstone Half Marathon
  • Explore the Colorado 14ers and backpack, climb, or run

Things I’ll table for 2018 or beyond:

… and I’m sure that as the year goes on, so will my list 🙂

Comment below if you’re interested in joining me on any of these adventures!

Boundary Peak via Queen Mine; Highpoint of Nevada

Nina and I met in June while climbing Mt. Baker and immediately bonded over this shared ambition to explore the highest peaks of the west coast. Just a month after exchanging contact information we put together a plan to meet halfway between San Francisco and Orange County to hike up the tallest mountain in Nevada, Boundary Peak (13,140′).

And actually, two days before we were meeting, we decided to tack White Mountain Peak (14,252′) onto our travel plans for a 13er and 14er two-fer weekend.

Let’s talk about getting there. You’ll find the beginning of a gravel road 9 miles east of Benton off of Highway 6, on your right (south) side of the road, just across from an abandoned ranch (see Summitpost for more detailed directions). I realize now that many of the sites I was using as a reference were as many as a dozen years old, and the 6.2 mile gravel road between Highway 6 and Queen Mine has severely deteriorated since then. I drive a 4WD Jeep Liberty Sports Edition, and sincerely doubted my car’s ability to get through the ruts and deep gouges that tore up this washed-out road. Maybe the conditions have worsened in just the last two years – a trip report I read from 2013 said this road was “easy peasy” in a 4×4 pickup.

In comparison, the following day we drove up the arduous 17-mile White Mountain Peak gravel path, which is labeled as a 4WD-only road by the National Forest Service, and we found this much more passable than the Queen Mine route. Either way, we were happy to get out of the car to start our climb.

We left my car at Queen Mine proper, an obviously large flat area next to a couple of open mine shafts. There was about 700 vertical feet, 1 mile, of road walking until we reached the trailhead register at Kennedy Point and our real hike began.

The Queen Mine trailhead register.

The Queen Mine trailhead register.

This first part of the hike was steep, and I could feel the altitude at 10,000 ft. sucking at my lungs. It didn’t take too long to ascend this first ridge, which flattens out after just a thousand feet into a nice sloping meadow where you can see wild horses, deer, and marmots. The Trail Canyon saddle slopes down to the left of this ridge and is unofficially “marked” with a pile of rocks and logs that created a perfect morning break spot to fuel up and hydrate before tackling the peak.

Here’s an overall breakdown of our timing:

  • 7:00am: Left Queen Mine trailhead
  • 8:30am: Took a break at the Trail Canyon saddle
  • 10:15am: Reached the summit of Boundary Peak
  • 11:00am: Departed the summit
  • 12:30pm: Took a second break at the Trail Canyon saddle
  • 1:45pm: Arrived back at the car
Our first views of Boundary Peak, a little less than a thousand feet above the trailhead... with wild horses!

Our first views of Boundary Peak, a little less than a thousand feet above the trailhead… with wild horses!

These first views were quite intimidating, but it was really only from this point that we could see the entire mountain. As soon as we descended to the Trail Canyon saddle, we could only see that first false-summit on the right. In fact, we’d forgotten about this image and believed that we were walking up to this first (much shorter) peak, to the actual summit.

Finally heading up the actual peak.

Finally heading up Boundary Peak.

You can see what we thought was the true summit here, when we really had an extra 1.5 hours and near a thousand vertical feet to gain still. The trail was reasonably sloped, covered in rocks and scree. It might’ve taken us just as much time to go up as it did to return since we were constantly slipping on the unstable conditions.

Looking down at Trail Canyon saddle. Farther to the right you can see the slightly uphill path that leads to Queen Mine.

Looking down at Trail Canyon saddle. Farther to the right you can see the slightly uphill path that leads to Queen Mine.

Our favorite view of Boundary Peak.

Our favorite view of Boundary Peak.

This was the “ah-hah” moment where we realized we were very, very miscalculated in our summit estimating. Overall, the trail was well-defined, and we never had too much of a problem finding the path once we’d wandered off. There were parts we chose to follow rock paths and bouldered up to avoid unnecessary elevation gain or loss, but the ridge was relatively easy to follow.

Looking across Nevada at the summit.

Looking across Nevada at the summit.

Reaching the summit felt like quite the accomplishment! We could see across Nevada and over to the Sierras and Yosemite region of California. On the top, Montgomery Peak (13,442′) loomed back at us from California. We speculated where the state border actually laid, and contemplated a second summit, but couldn’t spot a good trail and noted that the final 800 or so feet looked a little too sketchy.

Summit of Boundary Peak.

Summit of Boundary Peak, looking across to Montgomery Peak, a few hundred feet higher.

Looking down the ridge we ascended from the summit.

Looking down the ridge we ascended from the summit.

Returning down the way we came, we used the ridge above as a natural handrail and made our own path until we met with the Trail Canyon saddle again. We had run into 3 other groups during the day, and all 3 had also come from Queen Mine. Notably – we were also the only women we saw on the mountain that day (girl power!)

Returning through the meadow until dipping down to the left to Queen Mine.

Returning through the meadow until dipping down to the left to Queen Mine.

Looking down the valley from Queen Mine.

Looking down the valley from Queen Mine.

Below you can see where we chose to park – at the entrance to the abandoned Queen Mine. You can faintly see the road continuing up the ridge on steep switchbacks that take you 700′ up to Kennedy Point and the official trailhead. I never got a shot in the morning, but there was enough room for a few cars and tents with a firepit just to the right of my Jeep. By the time we arrived back at the car in the early afternoon, it was hot. The cool breeze that had kept us company at altitude disappeared once we’d reached the valley. Since this is one of the most remote desert hikes, and there are no sources of water along the trail, I’d highly recommend bringing three liters of water.

This is my recommended parking spot, next to the Queen Mine, before the super-rugged road conditions start to the traditional trailhead.

This is my recommended parking spot, next to the Queen Mine, before the super-rugged road conditions start to the traditional trailhead.

Leaving the trailhead, we were back in Bishop by 3:00pm… With just enough time to feed our hiker hunger and get ready for our ascent of White Mountain Peak in the morning.

QUICK STATS

  • Length: 10.4 miles
  • Trailhead: 9,200 ft.
  • Summit: 13,146 ft.
  • Elevation gain: 4,000 ft.
  • Time: 6:45 total, 6:00 moving

A few resources I found really helpful before this climb…

Mt. Diablo Base to Summit

As isolated as it is impressive, Mt. Diablo has the second largest visual prominence in the world, behind Mt. Kilimanjaro. That means from its summit you can see the Sierra Nevadas to the east and even Mt. Lassen, 181 miles north. It’s truly one of the most demanding peaks in the Bay Area, and makes for a hell of a day hike.

Starting up Eagle Creek Trail with the summit in clear view ahead of us.

Starting up Eagle Creek Trail with the summit in clear view ahead of us

I’d been up Diablo three years ago and decided to do the opposite loop from that time. This way was much more scenic, forested, and less crowded than taking the fire road up, albeit much more challenging. Here’s the distance breakdown:

  • Oak Road (fire road): 0.3 miles
  • Eagle Peak Trail: 3.1 miles
  • Bald Ridge Trail: 1.5 miles
  • North Peak Trail: 0.9 miles
  • Summit Trail: 0.7 miles (up to Visitor Center & Lookout)
  • Juniper Trail: 1.4 miles
  • Deer Flat Roadd (fire road): 1.6 miles
  • Mitchell Canyon Road (fire road): 3.7 miles
  • Total: 13.2 miles

    Taking a break before heading up Bald Ridge Trail.

    Taking a break before heading up Bald Ridge Trail.

    The steep ascent up Eagle Peak Trail was without a doubt, the most challenging of the day. Still, we made incredible time. We’d been warned – and expected – to have a 6 to 8 hour day ahead of us, but we reached the summit after only 2.5 hours of hiking. Descending took almost as long, probably because by the end of the day we were all exhausted and dragging our feet down the hills. Still, we were all in all very happy with our route choice and end time.

    Partway up Bald Ridge Trail… yet the summit still seems so far away.

    Clear views of the valley on the final ascent up the Summit Trail.

    Clear views of the valley on the final ascent up the Summit Trail.

    Corner of the lookout from the Mt. Diablo Visitor Center.

    Corner of the lookout from the Mt. Diablo Visitor Center.

    The one thing I remembered most about this hike from completing it years before was the anticlimactic feeling of arriving at the summit surrounded by people who had driven up. Still, there was a number of hikers who looked as rugged and worn out as we’d felt, lined up at the summit water spigot. Both the Visitor Center and lookout platform offer great 360 degree views and is lined with binoculars for far-off views on clear days.

Like I’d mentioned before, our route down was much less scenic, following a wide fire road for the entire journey. We saw larger groups of people ascending this direction, or stopping partway at scattered picnic tables. This road really drags on, and since it’s a couple miles longer (but less steep), than the way up – we were more than ready to throw down our packs and call it a day once we’d reached the car.

Beginning of a long, windy descent down the Deer Flat fire road to the Mitchell Canyon fire road.

Beginning of a long, windy descent down the Deer Flat fire road to the Mitchell Canyon fire road.

  •  

    QUICK STATS

  • Length: 13.2 miles
  • Elevation gain: 3.2k ft.
  • Time: 5 hours

Muir Beach to Rodeo Beach via the Coastal Trail

With six weeks left until my upcoming North Cascades climbs, I need to intensify my endurance training. I’ll be doing two back-to-back climbs on mountains averaging around 10k ft. in altitude, and as I’ve learned from past experiences, the only way to prepare for that is to run, hike, and climb with as much elevation gain as possible on my weekend training days.

Muir Beach is one of the first trails I discovered when I moved to SF, and has stuck to be one of my favorites. I’ve brought my parents, out-of-town friends, and regular hiking buddies here. Its out-and-back style makes it an easy route to shorten or lengthen based on your mood. Here’s a distance breakdown of popular turn-around points:

  • Muir Beach to Coastal Fire Road intersection: 2.2 miles
  • Muir Beach to Tennessee Valley: 3.1 miles
  • Muir Beach to Hill 88: 4.5 miles
  • Total one-way from Muir Beach to Rodeo Beach: 5.9 miles
Quarter-mile into the hike, looking down at Muir Beach.

Quarter-mile into the hike, looking down at Muir Beach.

I chose the perfect day, with San Francisco’s famous fog hanging overhead for most of the morning. It was chilly, but easy to warm up with the waterfront hills.

The first half mile is steep. The entire trail follows the coastline and winds up and down its peaks, and in and out of its valleys. You’re essentially walking (or running) from a lower elevation to a higher elevation and back the entire time, which some may find completely exasperating, or to others, as a challenge.

Shoreline views from the Coastal Trail.

Shoreline views from the Coastal Trail.

About halfway between Muir Beach and Tennessee Valley is a turnoff for Pirate’s Cove, a hidden little beach surrounded by tall, wind-swept and sea-swept rocks. At this intersection you’ll find one of two sets of rugged, wooden stairs on the trail that will slow down traffic a little. When trail running, this is one of the only spots that I’ll need to halt my speed to trudge up each step.

Just one more up-and-over and the trail widens as it merges with a fire road for the final stretch into Tennessee Valley.

Top of the fire road, looking down at Tennessee Valley - shoreline hidden by the hills.

Top of the fire road, looking down at Tennessee Valley – shoreline hidden by the hills.

When the fire road intersects with another wide trail, turn left for just 100 yards and you’ll see the continuation of the Coastal Trail on your right, with a mileage sign to Rodeo Beach. The walk from this intersection to the Tennessee Valley shoreline is 0.7 miles, which would’ve added 1.4 miles to my trip. I’ve done this option before and turned around at the beach, making the total hike around 7 miles.

Being in the valley means you’ve lost all of that legwork you did to get yourself up those hills, which also means you get to repeat that effort to get over to Rodeo Beach. To emphasize; it’s a lot of steep, steep hill climbing, and there’s not much benefit to the up-and-down nature of the path other than sheer enjoyment.

Leaving Tennessee Valley to go up, up, up and over to Rodeo Beach.

Leaving Tennessee Valley to go up, up, up and over to Rodeo Beach.

Here’s the most fun part of the trail. In the course of 1.15 miles, the Coastal Trail gains 800′ in elevation and peaks out at an exposed, windy plateau overlooking Tennessee Valley and even farther on. Continue up this hill to the tallest point of the day, and you’ll intersect a paved cycling road. Turning left here takes you a quarter mile to Hill 88. I’ve used this as a landmark too, returning to Muir Beach from Hill 88 makes a little more than a 9 mile track.

Turning right instead, the trail winds another mile and a half or so down to Rodeo Beach, which will probably be more crowded than Muir Beach. Make your way all the way down to the sand, and you get to look back and see all of the miles and elevation you get to do all over again on your return!

Overlooking Rodeo Beach, with views of the Golden Gate Bridge barely visible in the background.

Overlooking Rodeo Beach, with views of the Golden Gate Bridge barely visible in the background.

QUICK STATS

  • Length: 11.8 miles
  • Elevation gain: 3.5k ft.
  • Time: 3.25 hours

Purisima Creek Redwoods: Hiking over Half Moon Bay

My office is in a unique location; at the intersection of El Camino Real and Highway Bridge 92, which stretches from Hayward through San Mateo and over into Half Moon Bay. It’s easy for commuters to head north or south on the Peninsula, or even over to the East Bay, but the Half Moon Bay hills and endless trails along Skyline remain largely undiscovered. So, I took advantage of an early Friday afternoon to visit one of my favorite parks.

e9UqavEMSiml7aA8HstqQIG0fI8MH-AZwOfglBPDlgsbWcEI617qUjMMn6qF-QMSrZqu4RKtmmng_p9-di4I9d_MfNy7ZPsriH00T8Z0ZLMrB95Gce0yEuepBa-VecA9BWLmBUZRSic16haX3n1awhGkR8OziL3JxGenbG117JG1n0K6XRSrhxa289T9Xxac0_oz_KjjVs

Descending, still towards the top, along the Whittemore Gulch Trail

The main parking lot is right off of Skyline, which means the first half of the hike goes across the hills and into a valley, where it follows along the Purisima Creek. The route I chose circles the entire park counter-clockwise and is the longest circuit available in this open space. Here’s how the distance breaks down:

  • North Ridge Trail: 1.2 miles
  • Whittemore Gulch Trail: 2.2 miles
  • Purisima Creek Trail: 2.3 miles
  • Craig Britton Trail: 2.6 miles
  • Harkins Ridge Trail: 1.2 miles
Redwoods along Purisima Creek

Redwoods along Purisima Creek

The first two trails wind along the upper, exposed part of the hills for quite a while before dipping into the forest. Even then, it’s gradual, I had barely realized I’d entered the forest before I was surrounded by redwoods and had reached the valley floor; Purisima Creek.

There’s another major trailhead and parking area where Whittemore Gulch meets the Purisima Creek Trail, at the bridge to cross the creek. This trail becomes wider, flatter, and smoother, perfect for trail runners. I half-ran and half-hiked, slowing down over some of the ruttier areas that have been dug out by horses and cyclists. There are a lot of roots and rocks to look out for on these trails too, and areas on the Whittemore Gulch and Craig Britton can be tricky with slanting, steep slopes.

Sleep slopes along the Craig Britton Trail

Sleep slopes along the Craig Britton Trail

Craig Britton continues at a relatively flat elevation through the thick, forested redwoods until it intersects with Harkins Ridge Trail. The scenery changes as this trail goes up, redwoods falling away to thinner trees that let in more sunlight. By the time I reached the Harkins Ridge Trail and trudged up its dusty steep hills, I’d almost forgotten the entire first third of my day that had been like this – I was so used to the thick forest and tall trees.

The final views before the parking lot really reminded me how much this open space has to offer; completely different landscapes, wildlife, and ecosystems scattered between the dense valley floor and the top of the Skyline hills.

Final view over Half Moon Bay before the last stretch to the trailhead parking lot

Final view over Half Moon Bay before the last stretch to the trailhead parking lot

QUICK STATS

  • Length: 9.5 miles
  • Elevation gain: 1.8k
  • Time: 2.5 hours

Redwood Regional Park: West Ridge Trail to East Ridge Trail

It’s difficult to have a car in San Francisco. But it’s oh-so worth it when it comes to weekend getaways, especially with all the Bay Area has to offer. I’ve been to Muir Woods, Mt. Tamalpais, and Stinson Beach more times than I can count, so a few weeks ago I decided to check out what’s hiding in the East Bay, and found the perfect day trip less than 30 minutes outside of the city.

Redwood Regional Park, part of the East Bay Regional Park District, is a huge open space that’s super accessible, tucked away in the East Bay hills just a short drive from Oakland. From San Francisco, take 580 East off of the Bay Bridge and turn left off of the 35th Ave exit. This road turns into Redwood Road, which will take you to the main entrance of the park. There’s plenty of parking for a $5 fee, or you can squeeze in between other cars on the side of the main road just outside the entrance, which is how I entered the park today.

I created my own loop based on recommendations I’d read and convenience to my car location, but you can view each trail and loop more closely on Mappery.

When I first entered the park on foot, I found a couple of ways to jump up on a trail to my left that ran along a creek bed. This area of the park is lush with green plants and glows under a canopy of trees, with a very small one-track trail lined with rocks and roots. I managed to fall flat on my face within the first five minutes of my day.


Winding up towards the West Ridge Trail

Winding up towards the West Ridge Trail

I followed this trail up the left-side ridge and hit my destination, the West Ridge Trail, and continued on higher up. The path widens here to accommodate equestrians, bikers, and more hikers, and goes for miles and miles – and steeper and steeper. The West Ridge Trail narrows and widens again, snaking through thick forests and leveling out at look points with stunning views. I passed through so many ecosystems, from the thick green forest you see above through tall redwoods and up above dusty pastures covered in wildflowers.

More uphill on the West Ridge Trail

More uphill on the West Ridge Trail

These first few miles were the steepest of the day, and I was regularly alternating between trail running on flat surfaces to cutting my pace in half up hills. The bulk of my elevation gain was condensed into just the first third of this hike, which means ending the day at 1.6k total gain made a strenuous beginning. At the highest point of the West Ridge Trail, the path crosses a road that leads to Chabot Space & Science Center, and from then on, it’s pretty much all downhill.

Looking back up the West Ridge Trail, winding through the redwoods.

Looking back up the West Ridge Trail, winding through the redwoods.

Just about halfway through my hike, the windy trail through the redwoods evened out to a gaping valley on my right, and a parking lot up emerged ahead on the left. This is where the West Ridge Trail becomes the East Ridge Trail, and where I found many more people either starting or ending their day. There are a lot of leisurely trails that fork off of the main one and many people wander down these for shorter hikes or picnic spots. It’s easy to get stuck here, enjoying the views.

View from the East Ridge Trailhead

View from the East Ridge Trailhead. Naturally, the photo does not capture the beauty of this spot.

The last half of the hike was easy, and mostly downhill. The East Ridge is unlike its other half in that it’s largely exposed, dusty, and out of the redwoods. But both of these things also mean that I was able to see farther because of the lower tree line, and I paid more attention to the hills on the horizon since I was looking their direction, heading down. There’s something about a view like this, when I’ve stopped long enough to feel the blood in my limbs slow and my lungs open and I feel like I’m seeing this distance for the first time. It’s like taking that first breath of air when you come up from an ocean dive.

Afternoon rest spot on the East Ridge Trail, Redwood Regional Park.

Afternoon rest spot on the East Ridge Trail, Redwood Regional Park.

It was a beautiful, easy day that wasn’t completely inundated with crowds (unlike other Bay Area hiking options), and it reminded me of how lucky San Franciscans are to have so many options in this area.

QUICK STATS

  • Length: 7.5 miles
  • Elevation gain: 1.6k
  • Time: 2.25 hours

Desolation Wilderness: An attempt of Pyramid Peak

We set out to climb an impressive mark in the Sierra Nevada, specifically the Crystal Range, just to the west of Lake Tahoe: Pyramid Peak, the tallest point in the Desolation Wilderness, and a “must-do” hike according to other peak baggers around California. I had spent last weekend in Yosemite at Glacier Point, a peak standing at 7,214 ft., and had experienced a long, hot, grueling day that left me thirsty and with sunburns.

Now, Yosemite is just 2.5 hours south of Tahoe National Forest, so I imagined similar conditions on what I believed was a comparable hike. Furthermore, the Lyons Creek trailhead that leads to Pyramid Peak sits at 6,700 ft. and the top of the mountain reaches 9,983 ft., so I was braced for a challenging day hike – nothing more – and brought three friends along. I felt pretty prepared.

We can joke about it now; but we were absolutely, comically unprepared.

Driving up Wrights Lake Road, off of Highway 50, just before sunrise

Driving up Wrights Lake Road, off of Highway 50, just before sunrise

We left San Francisco at 4 a.m. and set out northeast. Only once we were winding up highway 50 towards Tahoe did we start seeing patches of snow, and when we finally caught our first glimpse of the mountains from the road, we all echoed the same thought: “Are those peaks… completely capped in snow?” We had not anticipated snow, at all.

I had to put my car into four-wheel drive heading up Wrights Lane Road, which takes you 4 miles off of highway 50 and straight to the Lyons Creek Trailhead, one of the more popular approaches up Pyramid Peak via the West Ridge route. We parked next to only one other car and set off in 1.5 to 2 ft. of snow around 6:45 a.m. I was the only one in the group wearing shoes that were not water resistant, and though my extra-tall gaiters helped guard snow from slipping inside of the tops of my boots, it did nothing for the soles, which were helplessly soggy all day long. All of our feet were soaked throughout the entire day, and at our turnaround spot two of the guys wrung out ounces and ounces of liquid from their sopping, sweaty socks. It was nasty.

We followed a set of tracks for the first two or three miles until they zig-zagged away from each other into different directions. We started following one, having to turn around after a quarter mile, and would follow the other until it doubled back and seemed to loop around to the original trail. Finally, Joey took the lead and started trail blazing into what we thought looked like the most obvious direction. Mind you, we did not have a map or a compass with us, we walked solely on instinct and with the intention to reach the clearing that we assumed must be so close.

Hiking through daybreak up the Lyons Creek Trail

Hiking through daybreak up the Lyons Creek Trail

That clearing was nowhere near as close as we thought it would be. Also, trail blazing is hard work. We were lifting our legs and dragging ourselves through almost 2 feet of untouched snow, reaching over trees and brush and rocks as we stumbled upon them. We did get validation that we were walking in the right direction each time we came across a cut log – those became one of our only signs that we were on the right path. Still, it was a tiresome and long process getting out of the main forest area.

When we finally reached the clearing that we’d been waiting hours to stumble upon, I realized that we had walked 7 miles that morning even though Sylvia Lake was supposed to have only been 4.7 miles from the trailhead. Part of that mileage would have come from turning around a handful of times, but I was worried that we might have been moving too far to the west, and missed a trail on the east, putting us even farther from the lake. A little after 10:30am, when we’d been walking for nearly 4 hours, we decided to camp out on a log to enjoy lunch, relax, and turn around. We left our sunny field spot at 11:30 and got back to the car by 2:00.

Our resting spot, with Pyramid Peak visible in the background.

Our resting spot, with Pyramid Peak visible in the background.

On the return, the streams we’d been hopping over (or in some cases, walked straight through) were rapidly expanding and quickening from the melting snow. The final two miles of our trip looked like an entirely different trail with the small tributaries that formed in the hours that had warmed us that morning.

Overall, it was a solid attempt. Everyone had high spirits and was eager to trek on through the less-than-ideal conditions. We all aided each other through the difficult snowy steps over logs and across streambeds, and most importantly, we’re all psyched to come back in a couple months once the snow has melted to give Pyramid Peak another shot.

QUICK STATS

  • Expected length: 11.4 miles
  • Actual length: 12.1 miles
  • Expected elevation gain: 3,300 ft
  • Actual elevation gain: 1,300 ft
  • Time: 7 hours
Panorama shot from Wrights Lake Road across the Desolation Wilderness

Panorama shot from Wrights Lake Road across the Desolation Wilderness

Glacier Point: Yosemite’s Panorama Trail

THE IDEA

I had never been to Yosemite before, so I wanted to make my first time worth something. I didn’t have to research for long before I found dozens of reviews calling Yosemite’s Panorama Trail one of the most scenic and must-see of the park. The 8.5 mile trail was marked “challenging” on most websites, so I could think of no word other than “grueling” to describe the round-trip version of this trip I had conjured on my own.

GETTING THERE – 1:45 a.m.

My alarm was set for 1:45 a.m., and I was out the door by 2:00. This was a late Friday night/Saturday morning for San Francisco, so I wasn’t surprised to see a number of drivers out around the city. Once passing through Oakland, though, it was smooth sailing. Around 4:00 I hit highway 120, which I knew would take me all the way to the West gates of the park, so I stopped for gas, coffee, and donuts. It probably only took me a little over an hour to reach the entrance of the park, making a grand total of 3 hours from my start in SF. However, and I’m glad I had called the park ranger in advance for this tip, I drove for 1.25 hours within Yosemite before reaching my destination, Glacier Point. As she reminded me the day before, it’s a big, big park.

I reached the Glacier Point parking lot at 6:15, and enjoyed the dawn on the steps of the large stone amphitheater carved into the side of the hill, overlooking Yosemite’s granite walls and Half Dome at the center of it. The sun started peeking over the hills at 6:30, and I soaked in the rays like a smile for a couple of minutes before beginning my journey.

First 10 minutes of day break, descending the Panorama Trail from Glacier Point

First 10 minutes of day break, descending the Panorama Trail from Glacier Point

SUNRISE START – 6:45

I opted to take the road less traveled for this trip. By beating the crowds with a sunrise start, I hiked for nearly 4.5 hours alone and uninterrupted. Since Glacier Point is around 25 miles and a couple thousand vertical feet outside of Yosemite Valley, it’s a much more popular afternoon destination for hikers than morning. So in this planning, I walked against the first crowds I encountered in the later morning coming up from the Valley, and again walked the opposite direction of hikers in the afternoon who were descending from Glacier Point. The direction and timing were perfect for a solo adventure, if not a completely delusional undertaking.

DESCENT

It’s counter-intuitive to begin a day hiking down the side of a mountain, rather than up it. In fact the early morning descending slope went against everything that my body was prepared for. That being said, it was a nice hike down, and a warm day even at 7:00 a.m.

Throughout the entire day, it was easy to stay on track. Each trail was clearly marked, and there were numerous intersections that allowed me to check my distance about every two miles. After the first 2.5 miles, I saw the large granite slabs that surround Illilouette Fall, and crossed a wooden footbridge to the only uphill section going this direction. Keeping my eyes peeled for the lookout spot I’d read so much about – and which makes this trail so unique – I soon saw the unmarked grey path in a little less than a mile. This path that veers to the left off of the main drag takes you to Panorama Point, which was hands-down the most beautiful view I saw all day.

Overlooking Panorama Point

Overlooking Panorama Point

I continued down the traditional Panorama hiking route, past Nevada Fall and Vernal Fall. The top of Nevada Fall offers another vantage point to look out across the park, and walking down the steep, crooked steps that parallel Vernal Fall gave me a cool break from the sun with its shadowed slopes and mist coming off from the waterfall. I read that these were two of the most impressive waterfalls in the park.

Now, note: The small stone steps that line Vernal Fall barely allow 2 bodies to pass through or past each other, so things get bottlenecked here pretty easily. But really, the only point that was inundated with crowds was once I reached the Valley floor, which was packed with people starting the hike up.

TURNAROUND – 10:30-10:50

The trail runs into road at the Happy Isles Trailhead, where I found a shuttle stop for the Valley’s free transportation. There was a snack stand that wasn’t open yet, so I began walking about a half mile to Curry Village hoping to find food. Alas, I did not, and sat on a boulder on the side of the road for a snack and a quick break before I started back up.

ASCENT

A mile past the Happy Isles Trailhead, the path splits left up the Mist Trail and right up the John Muir Trail. These are equidistant in length and meet back up in just about a mile, only difference is avoiding the slower hikers on the steep slopes of the Mist Trail. I did run into a couple of thru-hikers who were following the entire 221-mile John Muir Trail from Yosemite National Park to Mt. Whitney. They were pretty clean looking, so I had to imagine that they were following the traditional north-to-south route.

John Muir Trail to top of Nevada Fall

John Muir Trail to top of Nevada Fall

My time down and my time up were nearly identical, 4 hours either way. In the morning I had taken my time to venture off of the trail for the detours mentioned above (Panorama Point, Nevada Falls), and in the afternoon I had significantly slowed my pace and doubled my number of stops for rest and water. By the end of the day I had drunken almost all of the three liters I had brought with me.

END – 3:00

The last four miles of this trail were grueling, if not for the afternoon heat intensifying, but for the psychological torment of ending a day-long hike headed uphill, rather than down. But finally, over 19 miles and 6,100 elevation gain later, I made it to the top, much sweatier and more sunburnt than when I’d started.

QUICK STATS

  • 17 miles (with no detours) – 19.5 miles for me
  • Estimated 5,000 elevation gain
  • 8 hours

Cone Peak: Hiking the “Sea to Sky”

Cone Peak has been called the most spectacular mountain on the Big Sur coast of California, and rightfully so. It stands as the tallest coastal mountain in the contiguous lower 48 states, with the peak itself is a little less than 3 miles from the coast as the crow flies, but hikers will wind up 11 miles of trail to reach its summit- a demanding 22 miles round-trip. Daunting as that may sound, the changing landscapes made it all worth the while from the grassy coastal hills to the damp redwood forests, up through dry red stretches of dirt and onto the final white rocky ascent.

Beginning right off of Highway 1 at about 100 vertical feet, it’s earned its title the “Sea-to-Sky” trail for the challenging journey up nearly one vertical mile. The Vicente Flat Trail begins on the land side of Highway 1, marked by a small sign, adjacent to a larger one welcoming visitors to “Los Padres National Forest.” There’s decent parking at the trailhead for about 15 cars, which is also directly across the road from Kirk Creek Campground- a site that sits right on the edge of the Pacific Ocean, its users perched on top of bluffs an easy walking distance to the water.

Cone_Peak_Hike_1

View of Pacific Ocean from Kirk Creek Campground


I had planned to stay at this campground since it was hands-down the most convenient spot for getting an early start, but didn’t realize I had chosen this climb on the same weekend as the Big Sur marathon. The campground takes reservations between 6 months and 8 days in advance, and the rest of the spots are first-come, first-serve. I pulled in at around 6:45pm, feeling shattered when I saw the sign “Campground Full.” I circled the lot and pulled over to ask an older gentleman if there were any other places to camp, and he responded by telling me that him and his wife just had their friend cancel on them, and I could take his spot if I’d liked. So I spent the evening with John and Judy, trading part of my 32 oz. Sierra Nevada for some homemade, stove-cooked chili, before they went to sleep in their tent and I in my car.

My alarm was set for 5:30 a.m., and it felt warmer than I expected- maybe 50 degrees out. I was on foot on the trail at 6:05 a.m. when it was plenty light out to see the stunning views of the Pacific as I followed the trail upwards. The Vicente Flat trail inches north along grassy hills, giving climbers a fresh breeze (stronger wind in the afternoon), and powerful sound of the ocean for the first hour of the climb.

Cone_Peak_Hike_2

Pacific Ocean after hiking 1 hr / 500 vertical ft.


I wore leggings, thick socks, hiking boots, a long sleeved wicking shirt, a fleece, and a hat for the sun that came blazing later in the day. I packed a rainproof windbreaker and a down jacket just in case, though I didn’t end up needing either. Throughout the course of the day I ate a banana, apple, two granola bars, yogurt-covered pretzels as a nice treat at the top, and my favorite Cliff Blok chews for extra energy. I carried three and a half liters of water and ended up drinking nearly three by the time I had hit the road. I also packed SPF lip balm, ibuprofen for my knees on the way down, sunglasses, extra hair ties, gators and an extra pair of socks that I didn’t end up using. My ski poles saved me- both on the challenging ascent and for bracing myself downhill, the last couple miles being especially painful as my boots wore the skin of my feet thin (and completely off of my heels), precisely the reason I carry an extra pair of flip-flops in my car.

The first 5 miles to the back country campgrounds of Vicente Flat are easy going at 1620 feet. Continue past the campground for 2.5 miles up the steepest stretch that reaches Cone Peak Road at 3600 feet. Coming out of the forest and up onto the service road gives hikers a breath of fresh air- and a brand new view to enjoy. The road sits between the Pacific to your west and the rest of the Los Padres National Forest to your east, a whole new landscape to take in.

Cone_Peak_hike_3

Los Padres hills


I saw a couple cars on this road and a few runners who use it as a loop- it provides an alternate way down. Leaving from the Vicente Flat trail, you’ll turn left and walk along this service road for about 1.5 miles until you reach the Cone Peak trailhead on your left, marked clearly so you won’t miss it. The final 3 miles up can get chillier and may be cloud-covered. I walked through some fog and was worried it would affect my visibility , but once I got to the top I saw the promised views that stretched from the Pacific ocean, to the windy Highway 1 along the coast, and back east towards the rest of the San Lucia mountain range.

Cone_Peak_Hike_4

More Pacific views from Vicente Flat trail


I got to the summit at 10:35 a.m., staying 10 minutes and beginning my descent at 10:45. The summit itself is rocky with what looks like an abandoned ranger station, and trees were lined with snow from weather the night before. While I had seen a couple backpackers at their camp on my way up, it wasn’t until around noon that I ran into my first hikers headed up to the top. I felt lucky- by that time the fog that skirted the mountain expanded into a large cloud and gave no sign of wavering.

Cone_Peak_Hike_5

Looking back up at Cone Peak following descent


The sun got warmer in the early afternoon, but just as much as the wind picked up, so I stayed in my fleece all day long. I passed dozens of people the closer I got to Highway 1, many walking just up to the Vicente Flat campsite, some only walking a mile or two up the trail to relax on one of the many bluffs overlooking the ocean. I took just as much time on the way down as I did on the ascent; arriving back at my car at 3:15pm. Quick stop at John and Judy’s campsite to thank them again for their kindness with a bag of leftover trail mix, and I took off for the 3.5 hour long drive north to the Bay Area.